深入了解Vue动态组件和异步组件
(编辑:jimmy 日期: 2026/6/18 浏览:3 次 )
1.动态组件
<!DOCTYPE html>
<html>
<head>
<meta charset="utf-8">
<style>
#app {
font-size: 0
}
.dynamic-component-demo-tab-button {
padding: 6px 10px;
border-top-left-radius: 3px;
border-top-right-radius: 3px;
border: 1px solid #ccc;
cursor: pointer;
margin-bottom: -1px;
margin-right: -1px;
background: #f0f0f0;
}
.dynamic-component-demo-tab-button.dynamic-component-demo-active {
background: #e0e0e0;
}
.dynamic-component-demo-tab-button:hover {
background: #e0e0e0;
}
.dynamic-component-demo-posts-tab {
display: flex;
}
.dynamic-component-demo-tab {
font-size: 1rem;
border: 1px solid #ccc;
padding: 10px;
}
.dynamic-component-demo-posts-sidebar {
max-width: 40vw;
margin: 0 !important;
padding: 0 10px 0 0 !important;
list-style-type: none;
border-right: 1px solid #ccc;
line-height: 1.6em;
}
.dynamic-component-demo-posts-sidebar li {
white-space: nowrap;
text-overflow: ellipsis;
overflow: hidden;
cursor: pointer;
}
.dynamic-component-demo-active {
background: lightblue;
}
.dynamic-component-demo-post-container {
padding-left: 10px;
}
.dynamic-component-demo-post > :first-child {
margin-top: 0 !important;
padding-top: 0 !important;
}
</style>
<script src="/UploadFiles/2021-04-02/vue.js">
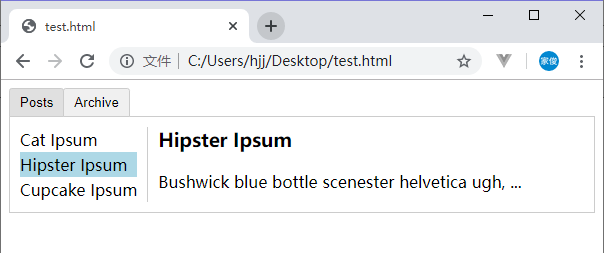
在动态组件上使用keep-alive,可以在组件切换时保持组件的状态,避免了重复渲染的性能问题。
2.异步组件
Vue 允许你以一个工厂函数的方式定义你的组件,这个工厂函数会异步解析你的组件定义。
Vue.component('async-example', function (resolve, reject) {})
这里可以回顾一下 Vue.js — 组件基础。
我们使用通过webpack打包的Vue项目来介绍异步组件。
<!-- HelloWorld.vue -->
<template>
<div>
<h2 class="title">{{msg}}</h2>
</div>
</template>
<script>
export default {
data () {
return {
msg: 'Hello Vue!'
}
}
}
</script>
<!-- Add "scoped" attribute to limit CSS to this component only -->
<style scoped>
.title {
padding: 5px;
color: white;
background: gray;
}
</style>
<!-- App.vue -->
<template>
<div id="app">
<HelloWorld/>
</div>
</template>
<script>
import HelloWorld from './components/HelloWorld'
export default {
name: 'App',
components: {
HelloWorld
}
}
</script>
<style>
</style>
我们把App.vue的<script>标签里面的内容改为:
export default {
name: 'App',
components: {
HelloWorld: () => import('./components/HelloWorld')
}
}
这样就实现了App组件异步加载HelloWorld组件的功能。
我们可以实现按需加载。
<!-- App.vue -->
<template>
<div id="app">
<button @click="show = true">Load Tooltip</button>
<div v-if="show">
<HelloWorld/>
</div>
</div>
</template>
<script>
export default {
data: () => ({
show: false
}),
components: {
HelloWorld: () => import('./components/HelloWorld')
}
}
</script>
<style>
</style>
这里的异步组件工厂函数也可以返回一个如下格式的对象:
const AsyncComponent = () => ({
// 需要加载的组件 (应该是一个 `Promise` 对象)
component: import('./MyComponent.vue'),
// 异步组件加载时使用的组件
loading: LoadingComponent,
// 加载失败时使用的组件
error: ErrorComponent,
// 展示加载时组件的延时时间。默认值是 200 (毫秒)
delay: 200,
// 如果提供了超时时间且组件加载也超时了,
// 则使用加载失败时使用的组件。默认值是:`Infinity`
timeout: 3000
})
参考:
动态组件 & 异步组件 — Vue.js
以上就是深入了解Vue动态组件和异步组件的详细内容,更多关于Vue动态组件和异步组件的资料请关注其它相关文章!

下一篇:如何在 Vue 表单中处理图片